These instructions are for the Watec video camera, with the supplied software.
No software is needed with the optional TFT or other TV or composite video monitor.
If you have the slim USB CCD, you need these instructions instead.
If you have the High Resolution CCD, you need these instructions instead.
If you have the Macro x-ray camera, you need these instructions instead.
If you have the Laue camera, you need these instructions instead.
If you have the EMCCD camera, you need these instructions instead.
The Watec WAT-120N+RC Video Neutron Camera
The original Watec video CCD integrates the exposure in-camera, outputting the integrated image in real-time as a standard PAL video signal. It is ideal for monitoring samples in-beam on a simple TV monitor, but the images can also be digitised and saved on a computer. This video camera is still available, but is being phased out in favour of the slim USB camera, which is entirely digital.
Version-4 camera specifications
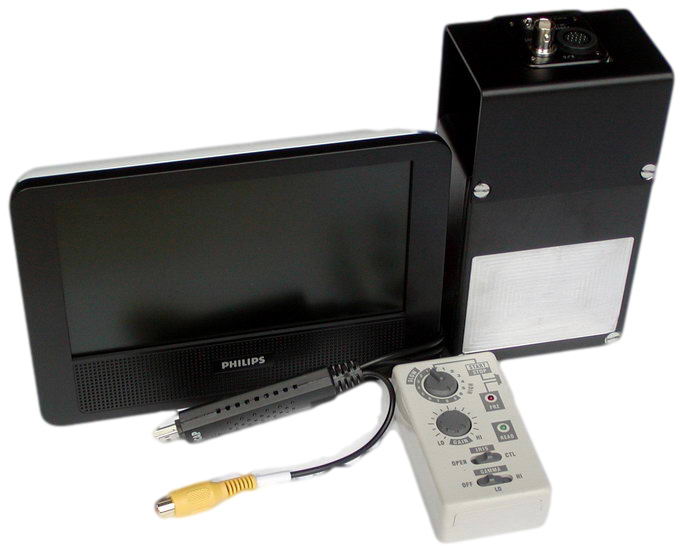
Supporting the camera and using a Video Monitor
Do not support the camera from the small CCD unit - you risk breaking the CCD unit from the camera body. Use the four 4mm screws on the back of the camera body. A small TFT monitor is an inexpensive solution for monitoring the image of the neutron beam, and if required can be used in parallel with a computer.Plug the three cables into the CCD unit
If you have the Peltier Cooling option...
If you have the Peltier Cooling option make sure you use the included higher power supply (12v at 750ma), otherwise you may see noise bars across the video. When it is plugged in, the cooling diode will blink rapidly while cooling, and the fan will start after a few seconds. When the temperature of the CCD reaches 10C, the cooling diode will glow steadily. The CCD temperature will be stabilized at 10C, about 30C lower than the normal operating temperature of an uncooled camera. Most of the isolated "hot pixels" will disappear, and if necessary any remaining noise can be removed by applying the "Salt & Pepper" filter, or by subtracting a stable background image. Press the diode to switch cooling off; the diode will blink slowly and switch off after ~10 minutes when the CCD has warmed up. You can switch off the power while the CCD is still cold, but you risk shortening its life due to thermal stress. See the Peltier User Guide for further details.Adjust the exposure control settings
See the back of the control unit for shutter speeds. The iris control is not used.
switch gamma to "LO" to obtain a better dynamic range.
the required time, then press the red button to "STOP" and obtain the read out.
preset exposures - from 0.0005 seconds to 90 minutes! You can also set the exposure,
and it will remain set while the camera is powered on, even if the controller is
switched off. A detailed manual can be downloaded. If you want to programme
the wireless controller using its RS232 connection to a computer, you can learn
how using our collection of controller scripts.
Using unlimited timed exposures
Short exposures are normally sufficient, but to expose for more than 10 seconds:Physical rotation of the image
You can transform the image in ImageJ, but as well the CCD unit can be physically rotated to invert the image or turn it through 90/270 degrees. After removing the CCD hood, the 3 small screws between the CCD unit and the camera body can be loosened using the supplied key, allowing the CCD unit to be rotated or removed completely. Take care that the exposed CCD chip is not touched, or exposed to dust or strong light. If light enters the exposed lens, you may see the remnant glow from the scintillator for several minutes after replacing the CCD unit. Don't disassemble the camera unless you really must; focusing can be degraded by imperfect re-assembly.General Information and FAQs
to the square of the largest side of the scintillator window.
vacuum connectors for the cables and a heat sink to dissipate 3 watts.
(replacements are available).
(more than 100 days in a constant 107 n.cm-2.sec-1 neutron beam).
isolated pixel flashes in the neutron beam.
the "salt and pepper" filter or the optional Peltier cooler.
(103 n.cm-2.sec-1), a diffuse noise patch may be seen in one corner of the image.
This is low-level infra-red radiation from the amplifiers at the edge of the CCD.
A solution is to subtract a "dark field" image obtained under the same conditions
with the neutron beam off, or use the ImageJ Process/Subtract Background.
If you remove the CCD unit and shine a light through the lens into the camera box,
you can activate the whole scintillator, which you can then see for some minutes
after you replace the CCD unit.
Hints on getting Optimal Performance
because the CCD chip is not centred to better than 0.5mm in its housing
Using a USB-2 frame grabber for computer display
To record and analyse the image, a USB-2 video frame grabber is needed, such as the EzCAP capture device included from version-3 of the camera or available as an optional extra for version-2. Do NOT plug it in before installing the EzCAP driver from the NeutronOptics CD.. Dismiss any warning that the driver has not been approved for Windows. After installation, re-boot then plug in the EzCAP device. Cancel any search on Windows update for drivers, and the drivers should be found. The alternative drivers or software from the EzCAP CD should also work.You can check that the driver is installed by right-clicking "My Computer/Properties" then "Device Manager". When the EzCAP device is plugged in, it should be listed under "Sound, video and game controllers" as "USB Audio Device" and "USB2.0 VIDBOX FW" without any yellow warning tags. Alternative drivers might be listed as "SMI Grabber DEV" or "USB 2861 Device" and "USB Audio Device" or under "Imaging Devices" or "Scanners and cameras" as "Grabster AV 350" or "USB 2861 Device". If necessary, double-click the device in the list, select "Driver", click "Update Driver" and "Search Automatically on C:\".To remove a driver, right click on it in "Device Manager" & select "Uninstall". Also uninstall any "SMI Grabber" application. Then reboot, install the latest drivers, reboot again and plug in the device.
Finally, connect the camera using the supplied video cable plugged into the yellow composite video socket of the EzCAP frame grabber. You should now be able to display the camera video using Windows media display software, such as AMCap, VLC, VirtualDub or the recommended SharpCap.
SharpCap Camera Control and Acquisition
SharpCap was designed for amateur astronomers and contains additional features that you will not need for x-ray or neutron imaging. SharpCap can be used with a wide variety of cameras, including our video camera, but also our "slim" lodestar camera as well as our high resolution Atik cameras (via ASCOM). The camera will be automatically recognised if it is plugged in, and you just need to choose it from the “Cameras” menu. A window will open with the image and camera controls on the right. You can arrange the order of controls by dragging the 3-line icon. An exhaustive SharpCap User Manual is available, but the instructions below may be sufficient to start with.
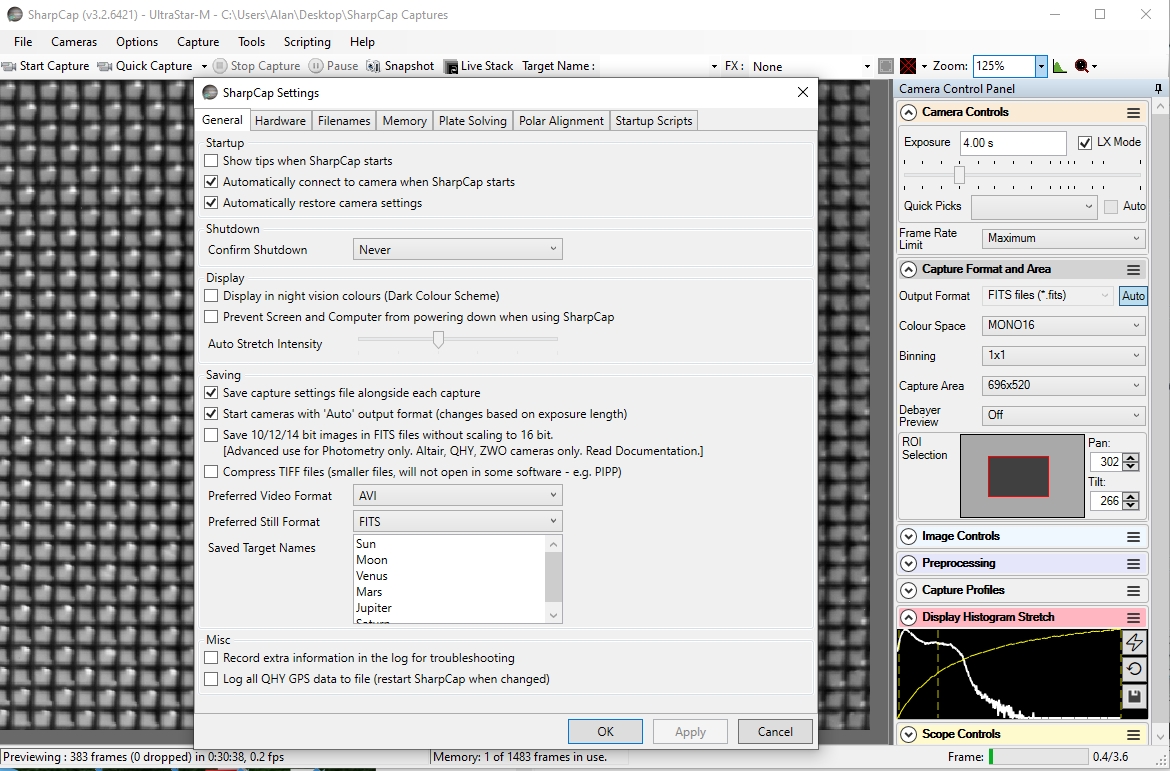
You can zoom the image with Ctrl-mouse-scroll or by using the zoom selection at the top right. In the "Camera Controls" you can set the Exposure (toggle LX mode for exposures >1 second), the Gain (higher gains also increase noise) and you can read the sensor temperature. In the "Capture Format", select TIFF or FITS and Mono16. In menu "File/Settings" turn off "Auto Output Format" and set the "Default Zoom" to 50%. You can drag the vertical line in the "Display Histogram" to stretch the intensity display to emphasise the lower intensities (and see the noise). Tip: set a "Default Profile" and the connected camera will be automatically selected with those settings when SharpCap starts.
Using AMCap Video Display Software
A licensed version of AMCap v9.20 will be found on the NeutronOptics CD. Drag the "AMCap" folder to the root level C: with your ImageJ folder (if you use ImageJ). DON'T install AMCap in a Windows directory that it cannot write to eg "C:\Program Files"With the USB frame grabber plugged in, click the AMCap "Devices" menu and select the device as the camera. Set "Options/Video Capture Filter" to "PAL", and the "Options/Video Capture Pin" to the maximum video size (720x576) at a frame rate of 25 hertz and maximum quality (1.0). The "Video Crossbar" should be set to "Video Composte In" and "Video Decoder Out".
To display the crosshair, useful for positioning samples, first choose "VMR9 Windowless mode" under Capture/Setup/Options then select menu Window/Crosshair. Double-click the AMCAP window to switch to a full screen display.
With AMCap, you can monitor the camera in real time and save a snapshot by pressing the "Enter" key. (Ignore the fussy Windows warning the first time you do this :-) You can remove noise, colour or do almost everything else with the free ImageJ software.
What if I see no image with AMCap ?
Use it to uninstall the current driver, reboot, install the new driver and reboot.
Using free software such as VideoLan VLC
VLC is a popular free alternative to the Windows media player, and also displays input from capture devices such as the EzCAP frame grabber. With the camera connected, select the device as the VLC "Video Device" and click "Play" to display the camera.If the display appears small or otherwise incorrect, before clicking "Play" click "Configure", select PAL as the video format, and set the video size to 720x576. The rightmost control on the display will allow you to adjust video effects such as contrast, brightness, rotation of the image etc. VLC's "Video/Snapshot" (or "Shift-S"), will save a snapshot of the display, while the "Tools/Preferences/Video" menu will allow you to set the format for this image file, as well as the directory where it will be saved (after re-opening the capture device).
Once you have configured VLC, you can open video input with "Ctrl-C" then hit "Return" to initialise the default stream and "Shift-S" to save a snapshot. Then use ImageJ to remove noise (Despeckle).
Introduction to ImageJ and Advanced Image Analysis

ImageJ is recommended for more complex image analysis. Acquisition with ImageJ allows integration over longer periods to produce 10-bit images, as well as the automatic stitching together of two cameras to form mosaic images extending the field of view. ImageJ acquisition is required if you have the 2-CCD Laue Camera or the EMCCD camera.
As well as the functions listed as menu items, a great number of custom
macros and plug-ins are available.
In particular, you can download our
AMCap video camera capture plugin for Windows, which installs the small camera icon shown above.
Using ImageJ functions to treat camera images
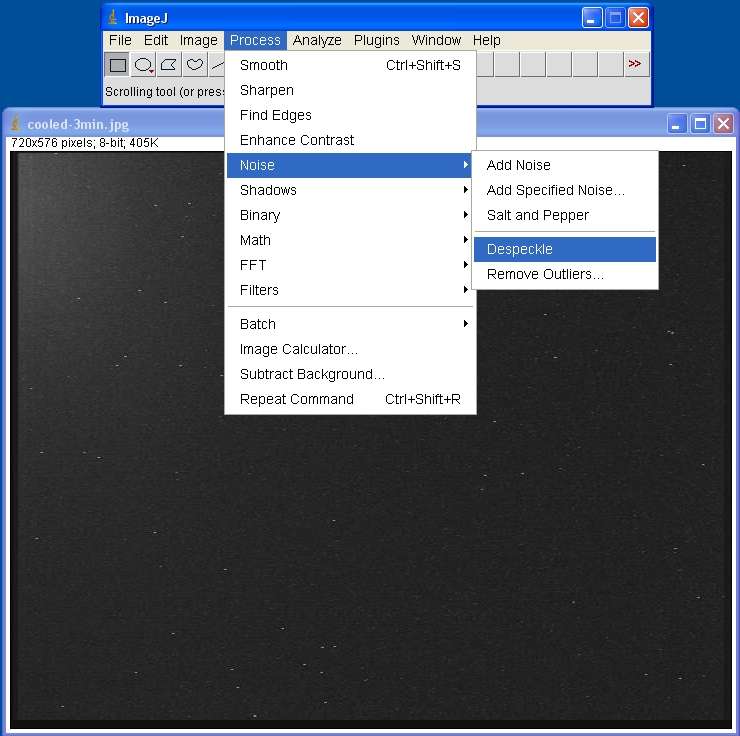
Drag an image to ImageJ or use the File /Open menu. The Image menu allows you to adjustF the image brightness, contrast etc, while the Process and Plugins menus allow more powerful operations. For example, here we see the use of the Process/Noise/Despeckle function to remove hot pixels from a long exposure.
The large number of ImageJ menus may at first seem challenging,
but the basic functions are similar to other image treatment
applications, and are fully documented.
The big difference is that ImageJ can be scripted to do everything, runs on any computer, and is free.
Click on the illustrations to enlarge them.
Using a Linux or Macintosh computer
Recent versions of Linux and Macintosh systems should contain drivers for the EzCAP frame grabber. For example with Ubuntu linux you can visualise the camera output using the standard v412 video driver with "mplayer tv://" eg:mplayer tv:// -tv driver=v4l2:width=720:height=576:outfmt=uyvy:norm=PAL:device=/dev/video0:input=1:fps=25
Mplayer also has switches to flip the image, take snapshots etc.
Both VideoLan VLC and ImageJ are available for linux and Macintosh.
You can download the NeutronOptics software CD for the Watec video camera.
Print these instructions
![]()